Unleash the power of SwiftLint
One of the things I really like with the Swift language is that Apple designed it for safety. Features like optionals or the different operators for downcasting prevent us from causing runtime crashes in our apps. In fact, we are now dealing with compile-time errors, and it changes everything. It is less prone to mistakes because the Swift compiler will stop us before. We can neither ship an application which cannot be built, nor run it in debug.
So, you can see me coming: why not consider doing the same control for our code style? Guess what, there is a tool doing exactly what we want: SwiftLint.
Hello, SwiftLint!
SwiftLint is a lint tool dedicated to Swift language. Lint means that the tool can analyze your source code and check it for programmatic and stylistic errors. It will help you make it consistent and better.
By running it, SwiftLint will flag every part of your code that does not respect the configured rules.
Today, SwiftLint is composed of *more than 150 rules of different categories. The project is open source, has a good community, many users, a lot of contributors, and regular releases.
What can you find ? Here are some examples. Stylistic rules that are about jumping lines, spaces, place of arguments, alignments, or a lot of other preferences. Smell code rules that are enforcing the compiler to detect bad things, complex code or optimized way. Also opt-in rules, that can be adopted depending on context.
There is a default configuration, but you can choose which rules you want to enable or disable. Moreover, particular rules have an advanced configuration like setting a trigger level, excluding a couple of strings, or choosing a severity. If you want to know more about installation and basic configuration, you can go to the GitHub page of the project.
https://github.com/realm/SwiftLint
How it works
As you can see, there are multiple ways to install SwiftLint. I recommend you to install it with Cocoapods, you will share the same version of the tool across your team machines, and updating on all machines will be easier. Otherwise, Homebrew is a good alternative.
SwiftLint is a command line tool, so you can execute it in any console. It can output several formats like JSON, XML, or Xcode. Yes, there is an Xcode format allowing you to integrate SwiftLint into Xcode. Useful to get real-time feedback. Other formats can be used by your CI.
You should add a build phase in Xcode with SwiftLint to analyze your code at each build. The benefit is that you will be alerted almost instantly when you do not respect a rule. Moreover, SwiftLint is well integrated with Xcode: reported problems look like compilation warnings and errors.
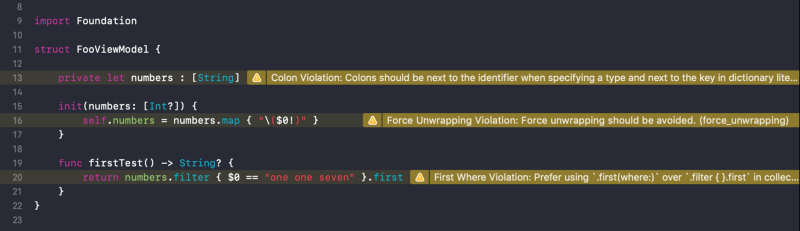
Example of warnings after building. Yell SwiftLint, yell!
To configure SwiftLint, you can add a .swiftlint.yml file inside the root directory of your project. You can find the file structure here, and a listing of all rules here. You will be able to choose which rules you want to enable, and parameters for these rules. For example, setting a maximum function body length to 10.
SwiftLint is flexible, you can disable rules, folders or files through the configuration file, and you can even disable specific lines directly in your swift file! Simply by putting a comment like // swiftlint:disable:mode <rule name>. Here are some variants for disabling the current line, the next line, or until you re-enable the rule.
One more thing. You saw that SwiftLint can report you violations. Guess what, there is a command to automatically correct certain rules: swiftlint autocorrect. Only a handful of rules can be corrected by this command, but it is working great.
Now that you are used to SwiftLint, I can share some of my personal experiences with you and some ideas to go further. Feel free to use it.
Unleash the potential of SwiftLint 🚀
Guide SwiftLint to guide you
Debate about your code convention, read every SwiftLint rules and determine which ones you want to enable. You will take control of SwiftLint, and SwiftLint will control your code.
We saw that SwiftLint is about enforcing your code style and convention. A first step can be to create your code convention if you don’t have one, or to ensure it is still up-to-date with your team. You can find inspiration in existing ones like Swift.org API Design Guidelines or Raywenderlich Style Guide, and choose to use a little part or almost all of it. The most important is to make your rules explicit.
Then the important step is to fully configure SwiftLint. The default configuration is a good start, but if you want to match your convention, you will have to read all available rules. A lot of rules are not enabled by default.
For each SwiftLint rule, you should decide if you want to enable it or not, and configure it. This is an interesting part because you may discover new rules to make your code better.
Remember to get your whole team involved. The best is to do it together. Or at least get the approval of your team if you are doing it alone, and ask for feedback.
Mastering rules
A lot of rules exist, and you should check the complete list with details and examples to learn more about them. If you want to be up-to-date and see precisely what’s new, you can check the release page on GitHub. This is useful when you are updating SwiftLint to discover how rules changed and how it can impact your project.
You can also go deeper. SwiftLint is open source, so you can look how a rule is implemented if you want. I did it when I wanted to know more about how a rule works or which parameters have to be used to configure it. Sometimes, it was just curiosity :)
Visualize your progression
Visualization is something very powerful. If you are looking on agile culture, many elements are visible. Metrics, charts, stories, sketches, … All of these are easily accessible, sometimes physically, by everyone. Teams know where they are, and where they go.
We can do the same for SwiftLint. When you have a lot of warnings (typically when you are adding a strict configuration on an existing project), it helps and motivates to know where you are and how numbers are evolving. You can have a metric for the main branch, the number of current warnings, and a chart gathering warnings through time. Put this on a dashboard, always visible, and you will see a super team improving the project.
If you have Jenkins, there is a simple way to get a graphic by using a plugin. For example, I chose androidLint. I added this plugin and I created a python script to convert the output of SwiftLint into the corresponding format. Then, I added a step in the Jenkinsfile: for each commit, SwiftLint is executed, the output is converted, and the plugin is called. This way, you can have a graph for each branch. You can analyze your feature branch, short-term, and also develop and master branch, long-term.
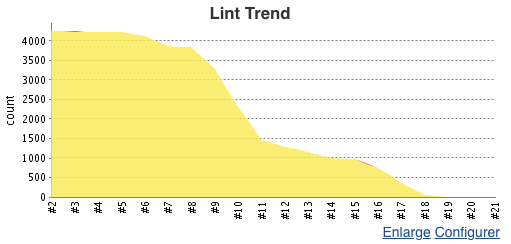
SwiftLint warnings’ eradication through time, on Jenkins.
You do not have a dashboard, a CI, or any tools? Let’s return to the future! Pick a pen, a sheet of paper and a post-it. We can write the current amount of warnings on the post-it and draw a chart on the sheet. Time on x-axis, and warnings on y-axis. Every day (or week or whenever you decide), put a new post-it with the updated number, and add a new point on the chart. Quick and efficient.
Limit regression
When you are putting effort to decrease the number of warnings, I think that you prefer to not add new violations. For that, you can add a safeguard.
You can set up your CI to fail a build if there is new lint errors. It can be done with the androidLint plugin on Jenkins for example, by configuring failedTotalHigh and failedTotalNormal arguments.
You may otherwise want to take a look at pre-commit git hooks, to forbid a commit containing violations, or at Danger to have automatic messages on your pull requests.
Nested configurations
Thanks to the YML file, you can configure every parts of SwiftLint for your project and your team. You are choosing which rules you want. And you can do more.
If you put an other configuration file deeper in the arborescence, it will be used instead of the main configuration at the root folder. Meaning, you can have specific rules for a specific folder including its children.
When linting a file, SwiftLint use the configuration in the current file folder, if any. Otherwise, it will recursively look in parent folders if there is one. If none, it will use the configuration file in the folder where the command was executed. And by default, SwiftLint uses its hardcoded default.
A possible use case is to have different rules for your unit tests target. You may want to have certain rules disabled or configured with different parameters. Be careful to not disable too many rules, your unit tests code is important and should be readable too.
Disabling a rule through code should be use sparingly
Do not abuse of disabling a rule inside a swift file with a comment. It can be tempting but it can hide another problem. Ask yourself why are you disabling the rule here.
Is it the first time I disable this rule? If not, you may need to reconsider this rule, or to configure it more accurately. Is it a real exception, or is it laziness ? You should have a good reason to disable it.
Let’s finish with you. How are you using SwiftLint? Do you have any tips to share? What did you learn?