Fixing thousands of SwiftLint violations over time
What would happen if SwiftLint were added to a project with a lot of existing code? You could have many violations, and much more when SwiftLint is deeply configured.
Having too many warnings can be discouraging, and there is also a bigger problem: too many warnings kill the warning. If you start to write code before resolving SwiftLint issues, you may miss some new important problems. So, let’s see how you can handle that.
Quarantine strategy ☣️
Most of the violations can be fixed without problem, but there are many. Then there are more complex issues. Some violations will need refactoring.
You will need time to handle every warning, and you have to take time. Do not go fast, do it well. As you may not fix everything at once, you will have to do it progressively. But how? How can we take time and live with so many warnings?
Our strategy will be to isolate infected files and exclude them, then to fix violations and files over time. This strategy also plans to visualize progress and prevent regressions.
Autocorrect is our magic wand
Before you start the quarantine, you can run the swiftlint autocorrect command. Only a handful of rules can be automatically corrected, but it is pretty efficient and it can save you a lot of time and effort.
Autocorrecting is the easiest part. It is automatic, and it is mainly dealing with spaces and indentations. Be sure to check changes after running the command.
Exclude infected files
More than a thousand of warnings on dozens of files. That’s what you can have. The goal of this step will be to fall to zero violation, as if there were nothing, but without fixing.
The idea of quarantine is to exclude all infected files from the analysis. An infected file is a file containing at least one violation. Only healthy files and new files will be linted.
In order to make the job easier, I wrote a script to list all infected files in a project. It will run SwiftLint, extract paths, and even format the output list.
#!/bin/bash

current_pwd=`pwd`
escaped_pwd=$(echo "$current_pwd" | sed 's/\//\\\//g')

# run swiftlint, grep to filter only lines with .swift, sed to extract paths, sort to group paths, sed to remove first slash, sed to add

Pods/SwiftLint/swiftlint | grep .swift: | sed 's/^\([^:]*\):.*/\1/' | sort -u | sed "s/$escaped_pwd//" | sed 's/^\///' | sed 's/\(.*\)/- \1/'
This script assumes that you did install SwiftLint in your project with cocoapods, and that you put the script in the root folder of your project. Feel free to change paths. The output of your terminal will look like that:
Loading configuration from '.swiftlint.yml'
Linting Swift files at paths
Linting 'ArticleListViewController.swift' (1/464)
Linting 'ArticleViewController.swift' (2/464)
...
Linting 'Widget.swift' (464/464)
Done linting! Found 336 violations, 30 serious in 464 files.
- MyApp/Article/ArticleListViewController.swift
- MyApp/Article/ArticleCell.swift
...
- MyWidget/Widget.swift
The first part is printed by SwiftLint. It is telling you which files are analyzed. The second part is the list of infected files with the relative path. This list is formatted. You will just have to copy and paste the result in the configuration file .swiftlint.yml under `excluded keyword. You may have to indent it.
excluded:
— Pods
- MyApp/Article/ArticleListViewController.swift
- MyApp/Article/ArticleCell.swift
...
- MyWidget/Widget.swift
From now on, the number of warnings is zero and we are preventing problems on healthy files. A warning will appear as soon as a code will violate a rule on these files. And that’s because SwiftLint is still integrated, enabled and fully configured with the rules you choose.
Only infected files at the quarantine creation are excluded. Their warnings are hidden and you will be able to handle them progressively. This step is performed only once, you may not have to exclude new files. We can imagine doing another quarantine if a change causes a lot of warnings (changing your rules or updating SwiftLint for example).
Treat infected files
Each time you have to edit an infected file, take the opportunity to correct few violations. Sometimes, you can also choose to pick a file and to treat all of its problems at once. Do not forget to remove a file from the excluded list when it becomes healthy.
Try to decide how you can take time to reduce warnings over time. Discuss about it with your team, with the other developers and also with your Product Owner or your manager. It can be for example two hours every Monday morning.
Visualize your progression
When you have hundreds or thousands of violations, it is helpful to know where you are and how numbers are evolving. It will also motivate your team to decrease the total of warnings.
You can create a second SwiftLint configuration file without excluded files in order to lint everything. Give it a different name, and specify it when running the swiftlint command: swiftlint --config .swiftlint-full.yml.
Your basic configuration is used to show you warnings through Xcode, without files in quarantine, and your CI or an other tool can execute SwiftLint with the second configuration in order to have a global vision. This way, you can make charts or have the current count to follow your progression.
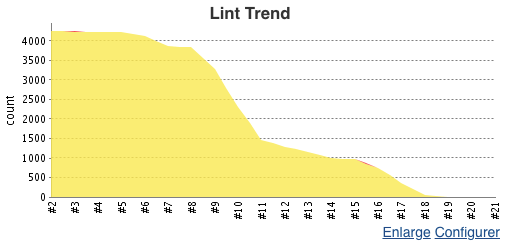
SwiftLint warnings’ eradication through time, on Jenkins.
In a dedicated article about SwiftLint, I wrote a part about the power of visualization. You can find how to easily have charts with Jenkins, or with a sheet of paper if you do not have any CI.
Forbid regression
While you are healing infected files, and even when the whole project is healthy, you should prevent new violations. Do not add new errors when you are writing code.
For that, set up your CI to fail a build if there is new lint errors. You may otherwise want to take a look at pre-commit git hooks, to forbid a commit containing violations, or at Danger to have automatic messages on your pull requests.
It is also helpful to use a second SwiftLint configuration here, linting infected files, to see hidden warnings. Remember that the quarantine disable analysis on infected file. So you need something to warn you if you are adding new violations inside these files.
Alternative ideas 🔀
Disabling rules
The principle of this quarantine strategy is to exclude from analysis each files containing at least one warning or error. Another possibility is to disable every of your rules in your configuration file.
This way, you will end up with zero violation. You can then re-enable a rule and fix corresponding warnings. One rule by one rule. It will give you the flexibility to correct problems progressively. The counterpart is that you will disable rules for every files, even healthy files or new ones.
Nested configurations
You can also profit nested configurations with SwiftLint. You can put different configurations in subfolders. Thanks to that, you can choose to specifically enable or disable rules in your project hierarchy.
We can even imagine combining both approaches: putting some files in quarantine, and disabling certain rules on specific subfolders.
Make your code consistent, and go further
If you want to know more about code consistency and how to unleash the power of SwitLint, you can read two of my previous articles:
And that’s all for now 👋
Thanks for reading. Feel free to make any feedback and to open discussion. Let’s finish with you. How are you using SwiftLint? Do you have any tips to share when you have too much warnings? What did you learn?